You don't have to be a celebrated iris hybridizer
to create lovely, never-before-seen varieties of irises. It
just takes some basic know-how and a good measure of
luck. In fact, some award winning iris were flukes.To
the average gardener, hybridizing irises may seem an
awesome task. But it is really quite easy. Just
begin with about a half-dozen or so of the best varieties
you can find. Before attempting a cross, study
the anatomy of the iris to recognize the reproductive
parts. Below is very brief and basic instructions. Serious
iris hybridizers join AIS (American Iris Society) and
make contact with other hybridizers.
Three Steps to Pollinating Irises
|
|

|
|

|
Step 1
|
Step 2
|
Step 3
|
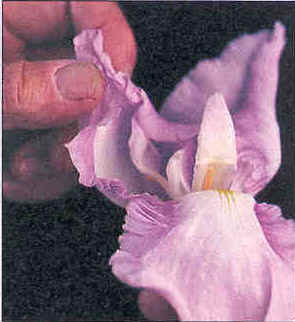
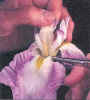
Step 1: Select two flowers that are just
ready to open and carefully pull down the falls to reveal
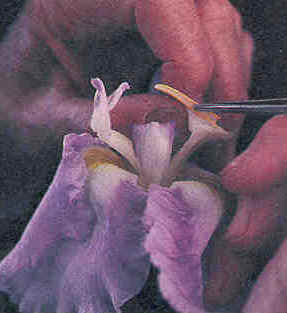
the reproductive structures.Step 2: Using
tweezers, remove an anther (the pollen-bearing filament)
from the iris chosen to be the male parent.Step 3: Brush
pollen from the anther against the underside of all three
stigmas (small liplike structure on the lower surface
of each style, pollen-receiving portion) of the female
parent. Rub firmly and gently until the pollen
sticks.Label the pollinated flower with weatherproof
tags to identify both parents. Most breeders list
the year followed by the female parent first (the flower
receiving the pollen) and the male second with a "x" between
the two parent names.For most tall bearded crosses, no
protective coverings are used to prevent random pollination
by bees or insects. With some bearded iris varieties,
the foliage may be secured using twist-tie. 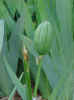 If
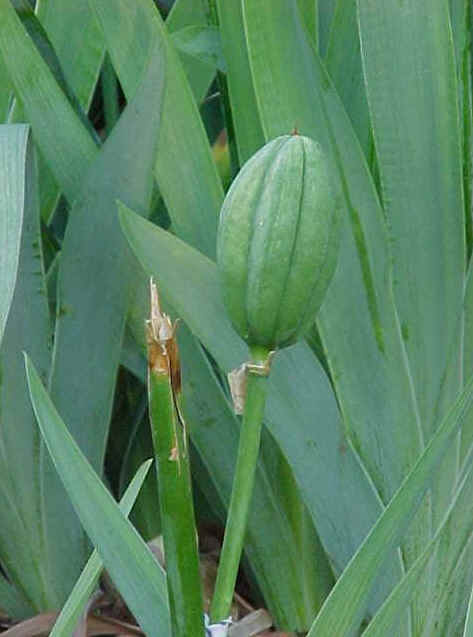
the pollinating was successful, the ovary (the ovule-bearing
pod at the base of the flower) will begin to swell within
seven to 10 days. In the fall, when the pods resemble
a light brown walnut shell and the top of the pod begins
to crack, it is time to collect the seeds. Most
pods contain 20 to 50 seeds. Crack open the pods
and remove the seeds. For some non-bearded
iris, the plant's seeds may be placed into individual
plastic bags, dust them with a pinch of fungicide powder,
add a drop or two of water for moisture and tie up the
bag. Carefully label the containers. For
Bearded iris, place the fresh seeds into a dry, clean
receptacle such as an envelope or dixie cup. Make
sure these seeds are kept dry and well aerated to prevent
mold formation. Carefully label these containers. By
fall, the seeds will be ready to plant. Tall bearded
iris seeds may be planted October or November before
winter arrives. Plant the seeds about 3/4 inches
deep and about one inch apart in light, well-drained
soil. Again, carefully label each planting area. Most
seeds will germinate the following spring, mature into
rhizomes in the summer, and bloom the second spring. There
is a lengthy wait from initial pollination to the first blooming. Below
is a picture from the Sutton's Green Thumber in Porterville,
California, which was submitted by Mike Sutton to the
iris-photo email list. The picture shows how uncontrollable
the RNA gene pool can be to a hybridizer. Thanks
goes to the Sutton family for their generosity to customers
and for their contributions to the advancement of the
Iris flower. If
the pollinating was successful, the ovary (the ovule-bearing
pod at the base of the flower) will begin to swell within
seven to 10 days. In the fall, when the pods resemble
a light brown walnut shell and the top of the pod begins
to crack, it is time to collect the seeds. Most
pods contain 20 to 50 seeds. Crack open the pods
and remove the seeds. For some non-bearded
iris, the plant's seeds may be placed into individual
plastic bags, dust them with a pinch of fungicide powder,
add a drop or two of water for moisture and tie up the
bag. Carefully label the containers. For
Bearded iris, place the fresh seeds into a dry, clean
receptacle such as an envelope or dixie cup. Make
sure these seeds are kept dry and well aerated to prevent
mold formation. Carefully label these containers. By
fall, the seeds will be ready to plant. Tall bearded
iris seeds may be planted October or November before
winter arrives. Plant the seeds about 3/4 inches
deep and about one inch apart in light, well-drained
soil. Again, carefully label each planting area. Most
seeds will germinate the following spring, mature into
rhizomes in the summer, and bloom the second spring. There
is a lengthy wait from initial pollination to the first blooming. Below
is a picture from the Sutton's Green Thumber in Porterville,
California, which was submitted by Mike Sutton to the
iris-photo email list. The picture shows how uncontrollable
the RNA gene pool can be to a hybridizer. Thanks
goes to the Sutton family for their generosity to customers
and for their contributions to the advancement of the
Iris flower.
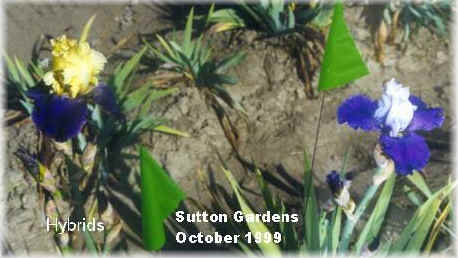
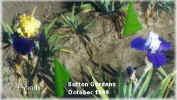 It
is always amazing to me to see such a difference
in two siblings. This is Jurassic Park X Mariposa
Skies the one on the left is just opening, the
one on the right is well opened. Notice the adequate
branching on the ameona and right next to it the
superb branching on the yellow and dark purple.
One has flaring form, one has a more "waterfall" type
form. The biggest difference, of course, is the
color combos. We will probably end up introducing
the yellow and purple rebloomer and the ameona
will probably be used only for breeding. This is
a late October 1999 picture. Mike
Sutton It
is always amazing to me to see such a difference
in two siblings. This is Jurassic Park X Mariposa
Skies the one on the left is just opening, the
one on the right is well opened. Notice the adequate
branching on the ameona and right next to it the
superb branching on the yellow and dark purple.
One has flaring form, one has a more "waterfall" type
form. The biggest difference, of course, is the
color combos. We will probably end up introducing
the yellow and purple rebloomer and the ameona
will probably be used only for breeding. This is
a late October 1999 picture. Mike
Sutton
Region
18 Hybridizers
|